3.4.2-extended-configuration
3.4.2.1 Process Query
This feature primarily sets the display style of the current Process Template in the front-end "Process Query" list view.
The Query List feature allows you to create and manage customized list views for processes that will be displayed to end-users.
-
Query List Overview
On the main Query List screen, you can see all configured views.- Create: Starts the configuration for a new list view.
- Search: Use the Enter Keywords to Search bar to find a specific view.
- List Details: Each view in the list displays its Title, who its Visitors are, and its current Status (Turned on/off).
- Operation: For each view, you can:
- Edit: Modify its settings.
- Delete: Permanently remove the view.
- Disable: Temporarily deactivate the view.
-
View Configuration
When you create or edit a view, you can configure it using several tabs.-
View settings
This tab controls the basic information and access permissions for the view.- Title: The name of the list view that users will see.
- Status: A toggle switch to turn the view on or off.
- Visitors: Specify which users or roles can see this view. If left empty, everyone can access it.
-
Filtering fields
This tab lets you add search filters that appear at the top of the list view.- Add Field: Click to select from a list of available fields (e.g., Process Status, Owner, Create Time) to make them available as filters for end-users.
-
Table settings
This tab controls the data and columns displayed in the list itself.- Form fields: Click Add Field to choose which fields will appear as columns in the data table.
- Data filtering: Set default filters for the data shown. You can choose from presets like My Creations or define Custom conditions (e.g., Process Status = Fixed Value).
- Pager: Select the pagination style for the list: Simple pager, Complex pager, or Nothing.
-
Export Settings
This tab manages the data export functionality for the view.- Exportable Users: Define which users or roles are allowed to export data from this view. If left empty, only administrators have this permission.
- Exportable Fields: Select the specific fields that will be included in the exported file. You can drag the fields to adjust their order. If no fields are set, all fields can be exported.
-

Figure 3.4–3 Process Query Configuration

Figure 3.4–4 Front-end Display of Process Query
- Settings Description:
Process query settings include search settings, filter settings, sort settings, export settings, table settings, and view settings.
a) View Settings
i. Basic Information - Settings: Set the title name for the Process Query list.
ii. Basic Information - Status: Disabled or Enabled status controls whether the process query list is displayed in "Process Query."
iii. Permission Settings - Accessible Users: Specifies who can view this process query list (if left empty, everyone can access it).
b) Table Settings:
Click the data list area on the interface to display the table Settings on the right.
i. Form Fields: Click the "+" icon to open the field dropdown menu, which includes main table fields and system fields. Drag to sort those fields.
ii. Data Filtering: Set filtering conditions for list data. Options include: My Creations, To-do, Completed, and Custom Conditions.
iii. Pagination: Process Query list pagination modes include: Simple Pager, Complex Pager, and Nothing.
c) Sorting Settings:
Click the sorting area on the interface to configure the sort field on the right.
i. Sorting Field: Click the "+" button on the sort field to open the dropdown menu. Select the desired field to add it to the sort list, which will then be displayed in the sort layout area.
ii. Sort Settings: Supports ascending and descending order sorting.
d) Export Settings:
Click the Export button area on the interface to configure export settings on the right.
i. Exportable Users: Specifies who can export query data during process queries. If left empty, everyone can export.
ii. Exportable Fields: Click "+" to open the export field dropdown menu. Options include main table fields, system fields, and detail table fields. You can select all fields from either the main table or detail table.
e) Filter Settings:
Click the upper area on the interface to edit filter settings on the right.
i. Click the "+" on the filter field to open the dropdown selection window. Select the desired field, which will be displayed in the filter layout area in real time.
ii. Supports batch settings for filter fields.
f) Search Settings:
Click the search area and to edit search settings on the right.
i. Search by number or title
ii. Search scope: Users can search by process number and title by default. Options for search scope here only contain single-line text and multi-line text field types. Fields required for searching can be selected based on business needs.
3.4.2.2 Default Permissions
Default permissions primarily determine the access and editing rights for other personnel during the flow of current process template, including default reader settings and default editor settings.
-
Default Readers:
After adding personnel, these individuals will have permission to view the process records during the active period. If left empty, only the author and process-related personnel can view them.
a) Active Time: Determine activation after the process approval or after submission by initiator.
b) The Initiator may not modify readable users: Reading permissions cannot be modified during process initiation. -
Default Editors:
Set the personnel who can edit the current process. After setting, these personnel can edit the process; if left empty, only the administrator can edit. (Administrator means super admin or the module admin, which can be assigned in “Permission” module by checking the box of “Process management_ Administrators” in Role Permissions.)
a) The initiator may not modify the editable users: Editing permissions cannot be modified when the process is initiated. -
Attachment Permissions:
Set form attachment permissions for the current process.
a) Radio Button Options:- Everyone (default selected) – All users can perform the action.
- No one – Completely restricts the action.
- Specified Users – Limits to selected users/groups.
b) Lock Checkbox (pre-checked, enforced): "The initiator cannot modify [action] users" – Prevents form submitters from changing these settings.
3.4.2.3 Parameter Settings
- Form Settings
a) Allow Copying Process Instance: Disabled by default. (Default setting for the whole module can be turned on in Process Mgt → Parameter Settings → Allow Copying Process Instance)
When viewing all processes they have initiated, the initiator can copy the original process data to initiate a new process, regardless of the current status of the process.

Figure 3.4–5 Copy as New Process Option
i. When enabled, the copied process will default to selecting the same fields as the draft node, ensuring the new process inherits identical field values from the draft node.
ii. If "Custom Fields" is selected, you can specify which fields to copy (instead of all fields from the original process). During copying, only the predefined subset of fields from the initiator's node will be transferred to the new process.
-
Archiving Settings:
When the archiving feature is enabled, users with the Process Management_Archiving Permissions role will see an Archive button upon process completion, enabling them to transfer the process record to the Archives Management application.-
Archive Configuration
Archive Path: (Required) Select an existing archive template from the Archives Management application.
Automatic Archiving: Check this box to enable automatic archiving. Specify the number of days after the "form is saved or the process ends" to trigger the archival. -
Archive Content
This section allows you to "Set the form content to be mapped to the archive management document."
-
-
Disable Operations: Not Checked By Default. Options include Disable creation, Disable updates, Disable deletion, and preventing Initiators from submitting after rejecting the Start Node.
-
Additional Settings:
b) Disable Initiation: When checked, creating new processes using this Process Template is prohibited.
c) Disable Updates: When checked, editing process documents is prohibited.
d) Disable Deletion: When checked, deleting process instances is prohibited.
e) Initiator Cannot Resubmit After Rejected to the Start Node: When checked, the initiator cannot resubmit at the start node after the handler rejects it.
f) Disable Initiator Abandon: When checked, the Initiator is prohibited from abandoning the process.
g) Disable Initiator Withdrawal: When checked, the initiator is prohibited from withdrawing the process. -
Knowledge Retention:
When enabled, users with Process Management_Settling Permissions can manually/automatically sync completed process documents to the Knowledge Warehouse application.-
Retention Path
Default Path: (Required) Sets the default knowledge category and template for the retention.
Repeat Retention: A toggle switch. When enabled, it "allows saving identical documents to the same path."
Auto-retain: A toggle switch to enable or disable automatic retention. -
Retention Content
This section maps Basic Information to the knowledge retention document. You can add more fields using the + Add button.
Each row maps a destination field to a specific field in the current form. The value type can be set in Fixed Value or Formula, which can be set in formula editor.
-
3.4.2.4 Summary Settings
In the Summary Settings page, users can configure the fields for the process list. Once configured, these settings will be displayed in a card-style format across pages such as "To-do," "Completed," and "My Request."
Users can configure which fields (e.g., Title, No., Create Time) display in process lists. Add summary fields via "Add summary" button on the right panel.
After configuring the summary, the summary will be displayed on the frontend pages such as "To-Do Tasks" and "Completed Tasks" in Process Mgt module. Note that you must first switch the process list to card mode in the upper-right corner of the page to view it.

Figure 3.4–6 Switch to card mode to display summary of processes
If you want to directly perform actions like "Approve" or "Reject" on the process summary card, you need to enable the "Quick Approval" (Template Mgt → Edit → Process Design → Node Property → Advanced → Quick Approval) switch in the corresponding approval node during process design. Only then can the assigned handler approve the process directly from the card list.

Note: The summary settings apply only to the process list in the Process Mgt application and should not be confused with Summary Approval.
The Summary Approval configured in process design is a platform-level feature of the Process Platform module, which encompasses all processes across the system—not just those in the Process Mgt app. This includes processes from all system modules and third-party systems connected to the platform.
3.4.2.5 Print Settings
In the Print Settings page, users can configure the print-out templates for process instances, including built-in templates and customization templates. After configuration, different print-out templates can be selected on the Process Instance page. Only users with Print Template Default Permissions (set in Permission module) can use this feature.
- Print Settings:
a) New Print Template: Allows creating custom print templates. First, add layout widgets, then add other widgets and Data Items in the layout widgets area. You can adjust the settings for paper size, paper orientation, and background images to create your desired custom template.

Figure 3.4–8 Create new print template by drag-and-drop widgets
b) Preview: Preview the Template. Users can preview the general appearance of the corresponding template.
c) Edit: Built-in templates allow only template name editing, whereas custom templates permit modifications to the name, settings, and content.
d) More - Copy: Copy an existing customization template. This will redirect you to the template editing page where you can modify and save changes, or save directly without modifications.
e) More - Permission settings: When left empty, the template is accessible to all users (restricted to users with Print Template Default Permissions, which is set in Permission module). When specific users are assigned, only those designated users can access and use the template.
f) More - Disable: When the template is disabled, it will not be visible on the front-end print page.
g) More - Delete: Delete Print template.
h) More - Set as Default: Designates the template as the default option. When accessing the front-end print page, this template will automatically load by default.
i) Batch Delete: Select multiple templates (built-in templates cannot be selected), click Batch Delete, and the templates will be deleted.
3.4.2.6 Electronic Signing Rules
Note: Only when MK system integrates with a third-party electronic signature platform can this function take effect.
Business Context:
In order to connect existing physical seals or electronic seals to MK systems, integration or unification with various ISV (Independent Software Vendor) solutions is needed. However, since each ISV provides different API interfaces, business teams must perform custom adaptations for each vendor during integration. This fragmented approach creates significant operational challenges.
To streamline this process, the Integration Platform module now serves as a centralized connector—handling direct communication with all ISV systems. The platform exposes a unified standard interface to business systems, eliminating the need for individual vendor-specific adaptations. As a result, business teams can now:
- Connect seamlessly to the Integration Platform’s standardized API, and
- Focus on core workflows without worrying about underlying ISV differences or interface variations.
a) Add Signing Rule: Create new signing rule. The signing rule window will pop up when clicked.
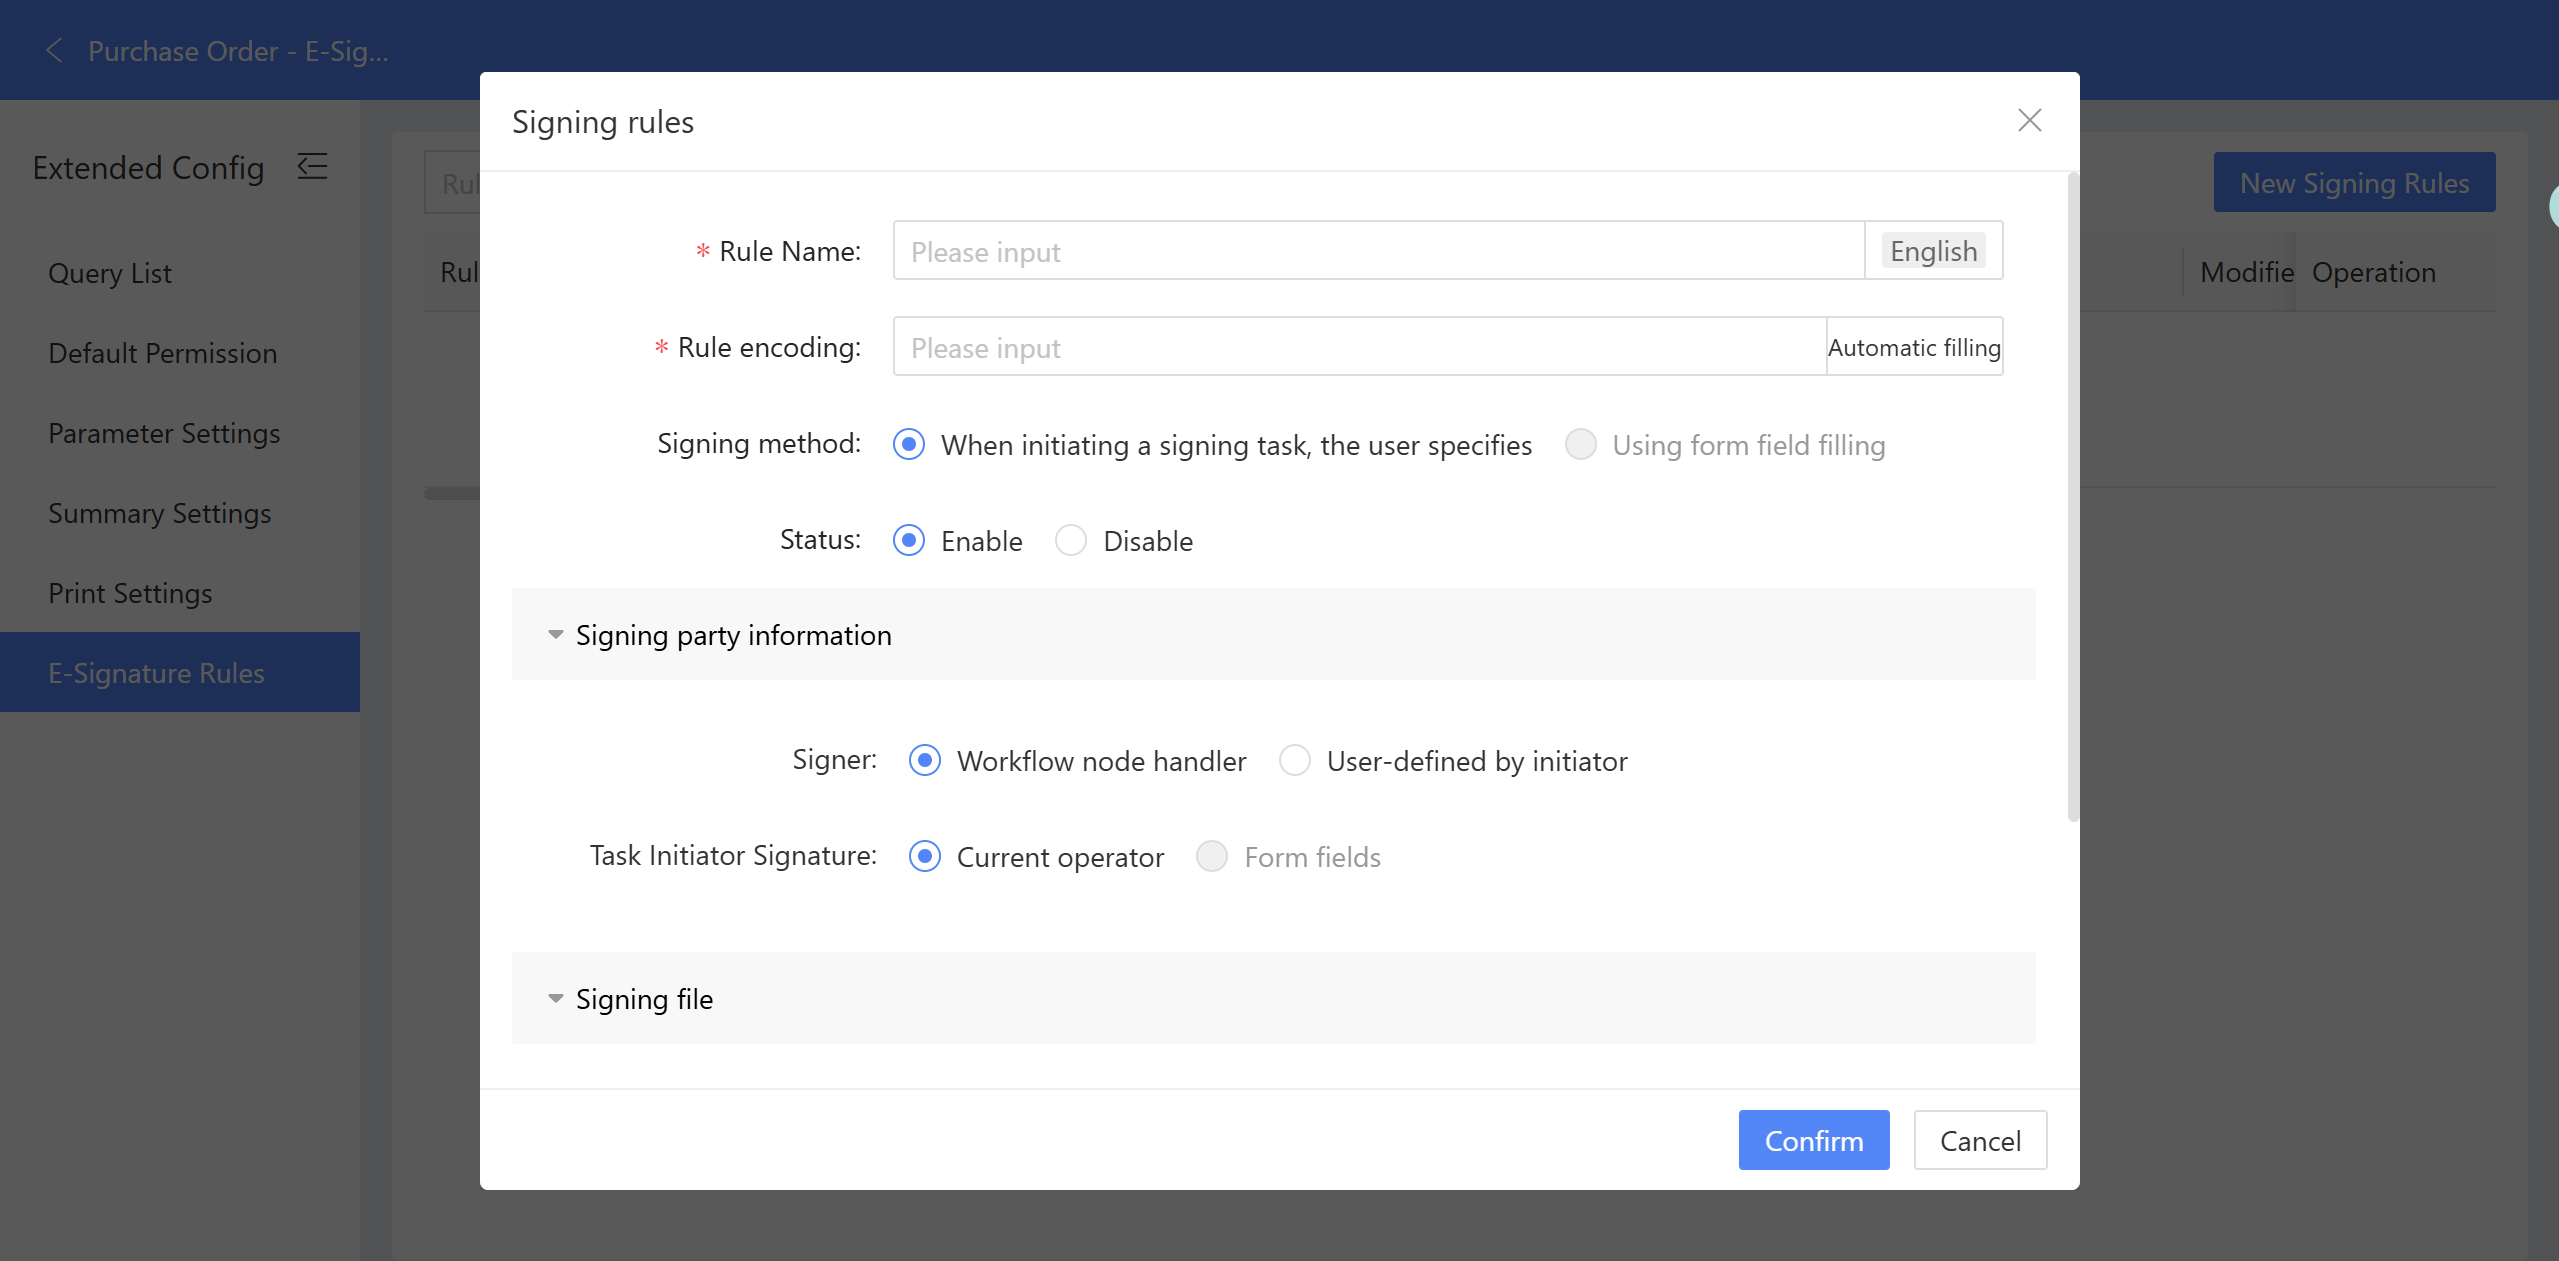
b) Rule Name: The name of the electronic signing rule.
c) Rule Code: The unique identifier for the signing rule. The code can be auto-filled.
d) Signing Method: Currently, the signing method can only be specified by the user when initiating the signing task.
e) Status: Includes Enabled and Disabled. The default status is Enabled.
f) Signatory: The signatory can be either the process node handler or any user designated by the workflow initiator. When “Process Node Handler” is selected, the node handler will automatically be included as a signatory when initiating the signing task.
g) Signing Task Initiator: Currently only the current operator is allowed to initiate signing task.
h) Source: Options include Form Fields and User Uploads. When Form Field is selected, signed documents are required to select. The field type for the attachment widget can be selected here.
i) Storage Location for Signed Doc: By default, this field is left blank. If left blank, the signed documents will not be displayed in the form. If a form attachment control is selected, the signed documents will be written back to the form attachments.
Configure Signing Rules in Approval Node
An electronic signing toggle can be turned on at the approval node. When enabled, the Signing Rule and execution node for the signing task must be selected.

Figure 3.4–10 Process Node Configuration for E-Signature
a) Signature Template: Only templates with an Enable status in the Signing Rules can be selected.
b) Sign at: Select the execution node for the signing task. Only approval nodes and signature nodes that come after the current node are available for selection.
Initiate Signing During Process Runtime
a) After the process is submitted, it flows to the initiation signing node (the node where E-signing is enabled). A 'Initiate Signing' button will appear in the upper right corner. The process cannot proceed to the next steps until the signing is initiated.

Figure 3.4–11 Signing Initiation Pop-up Window
b) Task Name: The name of the task to initiate signing.
c) File Upload: Documents requiring signatures (supports PDF, DOC, and DOCX formats).
d) Signing Entity: The institution that needs to sign.
e) Signatory: The person who needs to sign. The institution and signatory cannot both be empty.
Signing Information Tab in Process Details
After the signing task is initiated, a 'Signing Information' tab will appear on the process instance page.
a) Title: Displays the task name, with the Status defaulting to Draft
b) Signing Document: The file selected when initiating the signing process. If DOC or DOCX formats are selected, they will be automatically converted to PDF.
c) Signing Party: Individuals who need to sign.
d) Associated Process Node: Task Execution Node.
e) Initiator: The person who initiates the signing task.
f) Initiation Time: The time when signing task is initiated.
Signing in Progress
a) Status: When the task flows to the execution node, the status on Signing Information Tab will change from Draft to S